Getting started
Install with Google Tag Manager or WordPress
Add the snippet through Google Tag Manager or on a WordPress site, without editing theme files by hand.
You install the snippet once per site. Every future test runs through it, so new tests never need changes to your <head>.
The snippet is one script tag. Copy it from the app (the key is already filled in) and add it to the <head> of your control page, every variation page and any page used by a page visit or custom event goal. If you can edit your HTML directly, do that. Otherwise use one of the guides below.
<script src="https://www.freeabtest.com/sdk.js" data-key="cro_pk_prod_..." async></script>Google Tag Manager#
- 1
Create a tag
In your container, open Tags, select New and choose the Custom HTML tag type.
- 2
Paste the snippet
Paste the script tag from the app into the HTML box, exactly as it is.
- 3
Fire it as early as possible
Under Triggering, choose Initialization - All Pages. If you only want it on some pages, create an Initialization trigger with a Page URL condition that covers the control, variation and goal pages.
- 4
Raise the priority
Open Advanced Settings and set Tag firing priority to a high number, such as 100, so it runs before other tags.
- 5
Preview and publish
Use Preview to open your control page and check that the tag fired, then select Submit to publish.
A short delay is normal
Tag Manager loads after the page starts to render, so visitors sent to a variation may see the control for a moment before the redirect. For the smoothest result, put the snippet directly in the page <head> instead.
Custom events from Tag Manager#
To count a custom event goal from a Tag Manager trigger, add another Custom HTML tag that runs after the snippet:
<script>
  window.ABTest && ABTest.track('signup');
</script>WordPress#
Recommended: the FreeABTest plugin#
- 1
Download
Sign in and choose Download WordPress plugin on the Overview page, or visit the WordPress page. The plugin is free for account holders.
- 2
Upload and activate
In WordPress open Plugins, Add New, Upload Plugin, choose the zip and activate it.
- 3
Connect
Open Settings, FreeABTest and paste your public SDK key (it starts with
cro_pk_prod_). Or choose Connect WordPress on the Overview page to fill it in for you. - 4
Turn it on
Tick Add the snippet to my site, pick Production or Development and choose Save settings. Clear any page cache.
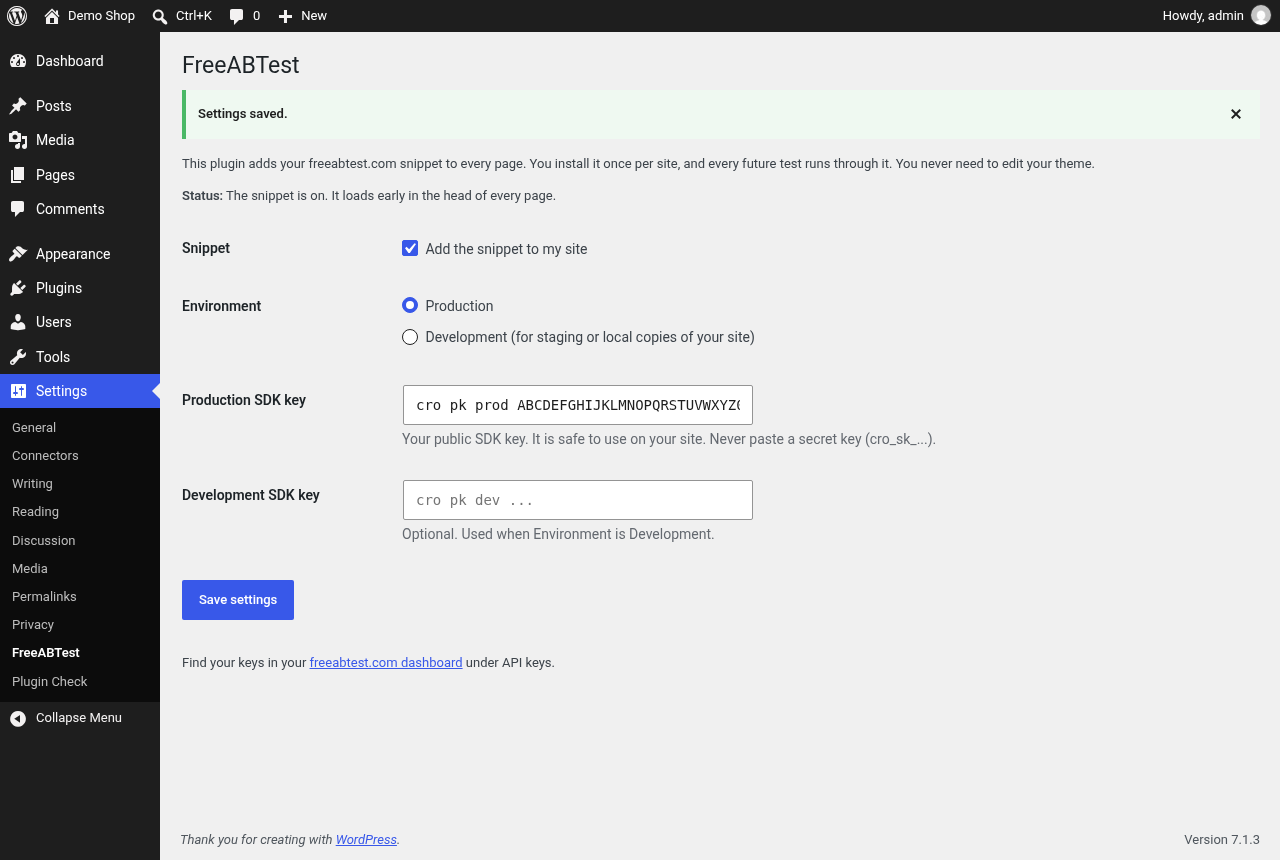
Prefer not to install a plugin? Use one of these options instead.
Pick one of these options. Both add the snippet to every page, which is fine: the snippet does nothing on pages that are not part of a running test.
Option 1: a header code plugin#
- 1
Install a plugin
In Plugins, select Add New and install a plugin that adds code to the site header, such as WPCode or Insert Headers and Footers. Activate it.
- 2
Paste the snippet
Open the plugin settings, find the Header box and paste the script tag from the app.
- 3
Save
Save the settings and clear any page cache.
Option 2: your theme#
If you use a child theme, add this to its functions.php. Changes to a parent theme are lost when it updates, so use a child theme.
add_action('wp_head', function () {
    echo '<script src="https://www.freeabtest.com/sdk.js" data-key="cro_pk_prod_..." async></script>';
}, 1);
Caching and speed plugins#
Plugins that delay, defer or combine JavaScript can stop the snippet from running in time. If you use one, add freeabtest.com/sdk.js to its list of scripts to exclude. After any change, clear the page cache so visitors get the new version.
Check that it works#
- Open your control page in a private window. Open the browser console and type
ABTest. You should see an object, not an error. - Start the test and visit the control page a few times in new private windows. The Results tab shows visitors within a few seconds.
- If nothing shows up, check that your domain is registered under Domains and see Troubleshooting.